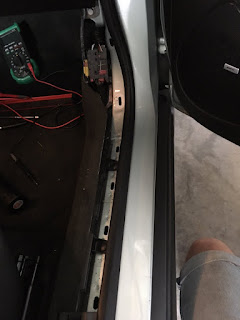
Blower module
Blower module aka Blower resistor replacement for a 2011 Volt (Gen1) 22745409
First step is to remove the trim on the passenger door sill. This is required as the right outboard screw holding the lower trim panel on is not accessible with the trim on.
Removal is simply prying it up and then back. It just has tabs that click into the slots you can see here.
The next step is to remove the lower trim panel.
There are three screws. (9/32 socket fits the head) One to the right of this picture. One to the left. Then one to the back center (toward the front of the car). I'll try to circle these in yellow later. The one in the middle was missing on my car. Makes me think someone has been here before.
To remove the module it is simply unplugging the wiring harnesses. There are 2 plugs. Typical press the tab and pull. Then there are 2 screws. One at the top and one at the bottom. I found a 7/32 socket fit these screws. Then the final thing is on the bottom post where the bottom screw was screwed, a plastic tab also keeps the module in place. simply flex it out of the way and slide it out.
My car is a 2011 but interestingly enough the date on the module in my car is JAN 2015. Oh. This has been replaced before. now in 2018 it is being replaced again. No wonder there is a redesign on the part.
Installation is the reverse of removal. But I added a bit to hopefully make this new module last longer. More about that later. But first. What's inside the box.
Some people call this the "Blower resistor" and while it has the same function as a blower resistor it isn't just a resistor. It is more like a power transistor and a relay. And a bunch of other junk. Reading some repair manuals it appears that a PWM signal is sent to this module and it chops up the voltage to get the different voltage speeds. Researching the components I found the white cube is a Relay, the bigger black chip is a power transistor.

When I took the module apart I noticed it looked like it had some kind of liquid get into it. The darkened areas in this picture aren't from the lighting. They are actually dark.
And looking at one of the connections I could see some corrosion. My theory was this. Some liquid dripped on it from above. Perhaps landing on that connector and then flowing inside to the board. Shorting it out. After the new module was installed it worked for a few years and eventually the same thing happened. Bugger. Don't want that happening to me every few years.
 Here is a picture looking up past the module with it all installed. I'm guessing something up there is dripping. Probably water. But I noticed on the white gear was wet. Felt slippery. I'm thinking the grease on the gear may be breaking down and dripping off. Or perhaps water is getting on the module from somewhere. Either way I was going to protect the module from drips from above.
What I did was took a piece of rubber (cut from an old tractor inner tube) and made a flap that coveres the front and top of the module. That way if liquid drips it will run over the tube and around the module. Suppose in a few years I could look and see if liquid got on the tube.
Hope this helps. Drop a comment if your blower module has failed.


Just thought I'd add to this post that it is 2024 and the blower module installed in this post is still working.
ReplyDelete