Posts

EV46??

Image
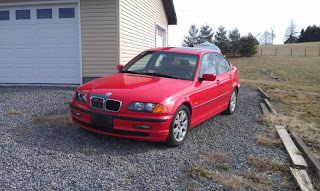
Been very bad about updating this blog.  The car has been driving around some as you can see in a few of the videos.  It is kind of a beat up chassis that have seen some hard times.  The dingy worn interior is getting to me.  I saw this forsale: So I bought it.  A 2000 323i.  Might make a good EV.  I haven't seen it in person yet as I'm out of town at the moment.  Will be interesting to see if it is a good EV candidate.

EV driving in my yard

Image
I like this clip as in the grass the car is really quiet. Not sure why everyone worries about EV's being too quiet. A lot of car noise comes from the tires on the road or gravel.

Controller works

Finished the High voltage wiring and wired up the "hair ball" for the controller. All looks to be working perfect.

Wiring

Image
I'm hoping by end of christmas break at the latest to have the EV moving on it's own power even if on ony 7 batts. Progress so far. Most of the high voltage lines are done. I need to make 3 more. Still haven't finished the return lines on the PS so that's left and then wire up the Hair ball. See how much longer that takes. Here are a few more part#'s and stores I bought from. Contactor: Kilovac EV200 Contactor. Purchased from E-bay Crimping tool: Lengo Swedg-on Tool Model 840 From E-bay Fuses and Heat shrink: purchased from EV Source LLC www.evsource.com 1ft Length, 1in Normal Adhesive Lined Heat Shrink Tubing, Red Item# 600-HSA-001-RE-N 3ft 1ft Length, 1in Normal Adhesive Lined Heat Shrink Tubing, Black Item# 600-HSA-001-BL-N 3ft 500A 300VDC fuse, Up to 1000A Controller up to 276V Nominal System Voltage Item# 201-A30QS500-4 qty 2

Even MORE battery trays

Image
I added the supports for the batteries on the tray that goes above the motor. That finished of my Argon gas for welding and had to get a refil. I think I'll use less now that I know what i'm doing. Started making battery cables. I played with soldering them on. I had thought of soldering AND crimping. However the fit of the lug to the wire was snug so inserting the wire with a heated lug didn't work well. So I'm just crimping. Using the hammer crimper in the press works very easy. Seems to be working well but I have no other experience with this type of work to compare it with. I also cleaned up or rather filed off some of the ugly welds. I need to re weld some of the bad ones. I'll also add some gussetts and some minor touchups. A real nice part is I won't have to paint it

Even more battery trays and

Image
More progress on the front battery tray. Added most of the upper tray above the motor. Spent most of saturday on it. Seems like I should have made more progress but it takes time. Also learning a new skill of welding aluminum does slow me down some. Some welds are great and some are horrid. I'm having a hard time telling what makes the difference. More practice is needed. Took a picture of my helper standing on the battery rack. Thought it would make a funny picture. Of course he reminded me that he only weighs what one battery weighs. So I stood on them. Seemed plenty strudy and so far the rack weighs less than 15 LBS. The mail man dropped off the fuses and heat shrink tubing. The wire lugs arrived earlier this week so I now have enough parts I should be able to make the car drive around the yard. Just some assembly required. Thaniel

Battery Tray progress

Image
Since I wanted to build battery trays out of alumiunm I purchased the materials needed to convert my MIG welder over to weld aluminum. After an evening of frustrating attempts at welding I did some more reading and found I had the heat setting all wrong. Today I managed to actually join some metal. Made a little progress on the front battery tray. There will be 4 batteries on the lower level. 2 on the passenger side of the motor one on the driverside and one inbetween. I need to add a tray to hold three batteries above the motor and more car to tray supporting structure. The lugs I ordered are suppose to be here monday. The fuses I ordered I have no clue. Maybe in a few weeks it can move under it's own power.